# Ollama - Llms-Txt
> Ollama on macOS and Windows will automatically download updates. Click on the taskbar or menubar item and then click "Restart to update" to apply the update.
- Skill: `tools-only/ollama-llms-txt` (Agent Skill, multi-file: 3 files)
- Install (CLI): `npx skillmds@latest add tools-only/ollama-llms-txt`
- Raw SKILL.md: https://api.skillmd.com/api/skills/tools-only/ollama-llms-txt/raw
- Safety review: pending (external: skill-scanner PASS, skillspector CAUTION)
- Works with: Claude Code, Claude.ai, OpenAI Codex
- Category: Coding & Dev Tools
- Author: tools-only (https://skillmd.com/u/tools-only)
- Updated: 2026-09-29
- Page: https://skillmd.com/skills/tools-only/ollama-llms-txt
---
# Ollama - Llms-Txt
**Pages:** 58
---
## FAQ
**URL:** llms-txt#faq
**Contents:**
- How can I upgrade Ollama?
- How can I view the logs?
- Is my GPU compatible with Ollama?
- How can I specify the context window size?
- How can I tell if my model was loaded onto the GPU?
- How do I configure Ollama server?
- Setting environment variables on Mac
- Setting environment variables on Linux
- Setting environment variables on Windows
- How do I use Ollama behind a proxy?
Source: https://docs.ollama.com/faq
## How can I upgrade Ollama?
Ollama on macOS and Windows will automatically download updates. Click on the taskbar or menubar item and then click "Restart to update" to apply the update. Updates can also be installed by downloading the latest version [manually](https://ollama.com/download/).
On Linux, re-run the install script:
## How can I view the logs?
Review the [Troubleshooting](./troubleshooting.md) docs for more about using logs.
## Is my GPU compatible with Ollama?
Please refer to the [GPU docs](./gpu.md).
## How can I specify the context window size?
By default, Ollama uses a context window size of 2048 tokens.
This can be overridden with the `OLLAMA_CONTEXT_LENGTH` environment variable. For example, to set the default context window to 8K, use:
To change this when using `ollama run`, use `/set parameter`:
When using the API, specify the `num_ctx` parameter:
## How can I tell if my model was loaded onto the GPU?
Use the `ollama ps` command to see what models are currently loaded into memory.
**Output**: `NAME ID SIZE PROCESSOR UNTIL llama3:70b bcfb190ca3a7 42 GB
100% GPU 4 minutes from now`
The `Processor` column will show which memory the model was loaded in to:
* `100% GPU` means the model was loaded entirely into the GPU
* `100% CPU` means the model was loaded entirely in system memory
* `48%/52% CPU/GPU` means the model was loaded partially onto both the GPU and into system memory
## How do I configure Ollama server?
Ollama server can be configured with environment variables.
### Setting environment variables on Mac
If Ollama is run as a macOS application, environment variables should be set using `launchctl`:
1. For each environment variable, call `launchctl setenv`.
2. Restart Ollama application.
### Setting environment variables on Linux
If Ollama is run as a systemd service, environment variables should be set using `systemctl`:
1. Edit the systemd service by calling `systemctl edit ollama.service`. This will open an editor.
2. For each environment variable, add a line `Environment` under section `[Service]`:
4. Reload `systemd` and restart Ollama:
### Setting environment variables on Windows
On Windows, Ollama inherits your user and system environment variables.
1. First Quit Ollama by clicking on it in the task bar.
2. Start the Settings (Windows 11) or Control Panel (Windows 10) application and search for *environment variables*.
3. Click on *Edit environment variables for your account*.
4. Edit or create a new variable for your user account for `OLLAMA_HOST`, `OLLAMA_MODELS`, etc.
5. Click OK/Apply to save.
6. Start the Ollama application from the Windows Start menu.
## How do I use Ollama behind a proxy?
Ollama pulls models from the Internet and may require a proxy server to access the models. Use `HTTPS_PROXY` to redirect outbound requests through the proxy. Ensure the proxy certificate is installed as a system certificate. Refer to the section above for how to use environment variables on your platform.
Avoid setting `HTTP_PROXY`. Ollama does not use HTTP for model pulls, only
HTTPS. Setting `HTTP_PROXY` may interrupt client connections to the server.
### How do I use Ollama behind a proxy in Docker?
The Ollama Docker container image can be configured to use a proxy by passing `-e HTTPS_PROXY=https://proxy.example.com` when starting the container.
Alternatively, the Docker daemon can be configured to use a proxy. Instructions are available for Docker Desktop on [macOS](https://docs.docker.com/desktop/settings/mac/#proxies), [Windows](https://docs.docker.com/desktop/settings/windows/#proxies), and [Linux](https://docs.docker.com/desktop/settings/linux/#proxies), and Docker [daemon with systemd](https://docs.docker.com/config/daemon/systemd/#httphttps-proxy).
Ensure the certificate is installed as a system certificate when using HTTPS. This may require a new Docker image when using a self-signed certificate.
Build and run this image:
## Does Ollama send my prompts and answers back to ollama.com?
No. Ollama runs locally, and conversation data does not leave your machine.
## How can I expose Ollama on my network?
Ollama binds 127.0.0.1 port 11434 by default. Change the bind address with the `OLLAMA_HOST` environment variable.
Refer to the section [above](#how-do-i-configure-ollama-server) for how to set environment variables on your platform.
## How can I use Ollama with a proxy server?
Ollama runs an HTTP server and can be exposed using a proxy server such as Nginx. To do so, configure the proxy to forward requests and optionally set required headers (if not exposing Ollama on the network). For example, with Nginx:
## How can I use Ollama with ngrok?
Ollama can be accessed using a range of tools for tunneling tools. For example with Ngrok:
## How can I use Ollama with Cloudflare Tunnel?
To use Ollama with Cloudflare Tunnel, use the `--url` and `--http-host-header` flags:
## How can I allow additional web origins to access Ollama?
Ollama allows cross-origin requests from `127.0.0.1` and `0.0.0.0` by default. Additional origins can be configured with `OLLAMA_ORIGINS`.
For browser extensions, you'll need to explicitly allow the extension's origin pattern. Set `OLLAMA_ORIGINS` to include `chrome-extension://*`, `moz-extension://*`, and `safari-web-extension://*` if you wish to allow all browser extensions access, or specific extensions as needed:
**Examples:**
Example 1 (unknown):
```unknown
## How can I view the logs?
Review the [Troubleshooting](./troubleshooting.md) docs for more about using logs.
## Is my GPU compatible with Ollama?
Please refer to the [GPU docs](./gpu.md).
## How can I specify the context window size?
By default, Ollama uses a context window size of 2048 tokens.
This can be overridden with the `OLLAMA_CONTEXT_LENGTH` environment variable. For example, to set the default context window to 8K, use:
```
Example 2 (unknown):
```unknown
To change this when using `ollama run`, use `/set parameter`:
```
Example 3 (unknown):
```unknown
When using the API, specify the `num_ctx` parameter:
```
Example 4 (unknown):
```unknown
## How can I tell if my model was loaded onto the GPU?
Use the `ollama ps` command to see what models are currently loaded into memory.
```
---
## Quickstart
**URL:** llms-txt#quickstart
**Contents:**
- Run a model
Source: https://docs.ollama.com/quickstart
This quickstart will walk your through running your first model with Ollama. To get started, download Ollama on macOS, Windows or Linux.
Download Ollama
Open a terminal and run the command:
Lastly, chat with the model:
Start by downloading a model:
Then install Ollama's Python library:
Lastly, chat with the model:
Start by downloading a model:
Then install the Ollama JavaScript library:
Lastly, chat with the model:
See a full list of available models [here](https://ollama.com/models).
**Examples:**
Example 1 (unknown):
```unknown
ollama run gemma3
```
Example 2 (unknown):
```unknown
ollama pull gemma3
```
Example 3 (unknown):
```unknown
Start by downloading a model:
```
Example 4 (unknown):
```unknown
Then install Ollama's Python library:
```
---
## Generate a chat message
**URL:** llms-txt#generate-a-chat-message
Source: https://docs.ollama.com/api/chat
openapi.yaml post /api/chat
Generate the next chat message in a conversation between a user and an assistant.
---
## Get version
**URL:** llms-txt#get-version
Source: https://docs.ollama.com/api-reference/get-version
openapi.yaml get /api/version
Retrieve the version of the Ollama
---
## VS Code
**URL:** llms-txt#vs-code
**Contents:**
- Install
- Usage with Ollama
Source: https://docs.ollama.com/integrations/vscode
Install [VSCode](https://code.visualstudio.com/download).
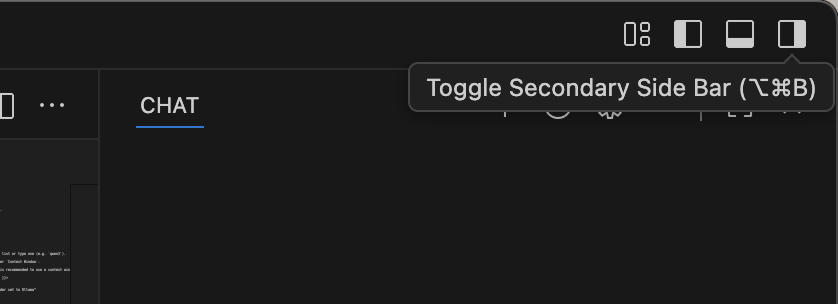
1. Open Copilot side bar found in top right window
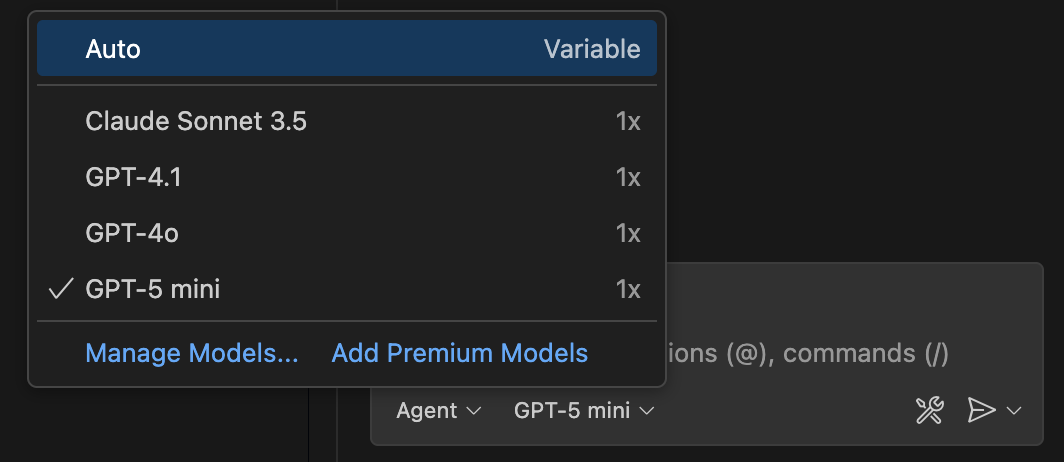
2. Select the model drowpdown > **Manage models**
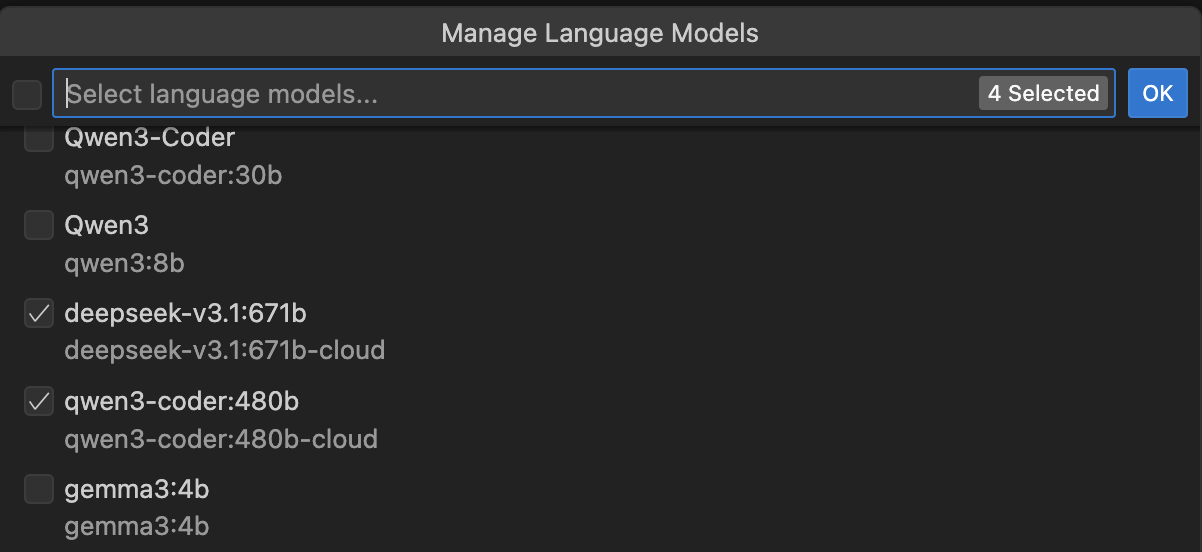
3. Enter **Ollama** under **Provider Dropdown** and select desired models (e.g `qwen3, qwen3-coder:480b-cloud`)
---
## Cloud
**URL:** llms-txt#cloud
**Contents:**
- Cloud Models
- Running Cloud models
- Cloud API access
- Authentication
- Listing models
- Generating a response
Source: https://docs.ollama.com/cloud
Ollama's cloud is currently in preview.
Ollama's cloud models are a new kind of model in Ollama that can run without a powerful GPU. Instead, cloud models are automatically offloaded to Ollama's cloud service while offering the same capabilities as local models, making it possible to keep using your local tools while running larger models that wouldn't fit on a personal computer.
Ollama currently supports the following cloud models, with more coming soon:
* `deepseek-v3.1:671b-cloud`
* `gpt-oss:20b-cloud`
* `gpt-oss:120b-cloud`
* `kimi-k2:1t-cloud`
* `qwen3-coder:480b-cloud`
* `glm-4.6:cloud`
* `minimax-m2:cloud`
### Running Cloud models
Ollama's cloud models require an account on [ollama.com](https://ollama.com). To sign in or create an account, run:
To run a cloud model, open the terminal and run:
First, pull a cloud model so it can be accessed:
Next, install [Ollama's Python library](https://github.com/ollama/ollama-python):
Next, create and run a simple Python script:
First, pull a cloud model so it can be accessed:
Next, install [Ollama's JavaScript library](https://github.com/ollama/ollama-js):
Then use the library to run a cloud model:
First, pull a cloud model so it can be accessed:
Run the following cURL command to run the command via Ollama's API:
Cloud models can also be accessed directly on ollama.com's API. In this mode, ollama.com acts as a remote Ollama host.
For direct access to ollama.com's API, first create an [API key](https://ollama.com/settings/keys).
Then, set the `OLLAMA_API_KEY` environment variable to your API key.
For models available directly via Ollama's API, models can be listed via:
### Generating a response
First, install [Ollama's Python library](https://github.com/ollama/ollama-python)
First, install [Ollama's JavaScript library](https://github.com/ollama/ollama-js):
Next, make a request to the model:
Generate a response via Ollama's chat API:
**Examples:**
Example 1 (unknown):
```unknown
ollama signin
```
Example 2 (unknown):
```unknown
ollama run gpt-oss:120b-cloud
```
Example 3 (unknown):
```unknown
ollama pull gpt-oss:120b-cloud
```
Example 4 (unknown):
```unknown
pip install ollama
```
---
## Pull a model
**URL:** llms-txt#pull-a-model
Source: https://docs.ollama.com/api/pull
openapi.yaml post /api/pull
---
## Structured Outputs
**URL:** llms-txt#structured-outputs
**Contents:**
- Generating structured JSON
- Generating structured JSON with a schema
- Example: Extract structured data
- Example: Vision with structured outputs
- Tips for reliable structured outputs
Source: https://docs.ollama.com/capabilities/structured-outputs
Structured outputs let you enforce a JSON schema on model responses so you can reliably extract structured data, describe images, or keep every reply consistent.
## Generating structured JSON
## Generating structured JSON with a schema
Provide a JSON schema to the `format` field.
It is ideal to also pass the JSON schema as a string in the prompt to ground the model's response.
Use Pydantic models and pass `model_json_schema()` to `format`, then validate the response:
Serialize a Zod schema with `zodToJsonSchema()` and parse the structured response:
## Example: Extract structured data
Define the objects you want returned and let the model populate the fields:
## Example: Vision with structured outputs
Vision models accept the same `format` parameter, enabling deterministic descriptions of images:
## Tips for reliable structured outputs
* Define schemas with Pydantic (Python) or Zod (JavaScript) so they can be reused for validation.
* Lower the temperature (e.g., set it to `0`) for more deterministic completions.
* Structured outputs work through the OpenAI-compatible API via `response_format`
**Examples:**
Example 1 (unknown):
```unknown
```
Example 2 (unknown):
```unknown
```
Example 3 (unknown):
```unknown
## Generating structured JSON with a schema
Provide a JSON schema to the `format` field.
It is ideal to also pass the JSON schema as a string in the prompt to ground the model's response.
```
Example 4 (unknown):
```unknown
Use Pydantic models and pass `model_json_schema()` to `format`, then validate the response:
```
---
## Context length
**URL:** llms-txt#context-length
**Contents:**
- Setting context length
- App
- CLI
- Check allocated context length and model offloading
Source: https://docs.ollama.com/context-length
Context length is the maximum number of tokens that the model has access to in memory.
The default context length in Ollama is 4096 tokens.
Tasks which require large context like web search, agents, and coding tools should be set to at least 32000 tokens.
## Setting context length
Setting a larger context length will increase the amount of memory required to run a model. Ensure you have enough VRAM available to increase the context length.
Cloud models are set to their maximum context length by default.
Change the slider in the Ollama app under settings to your desired context length.
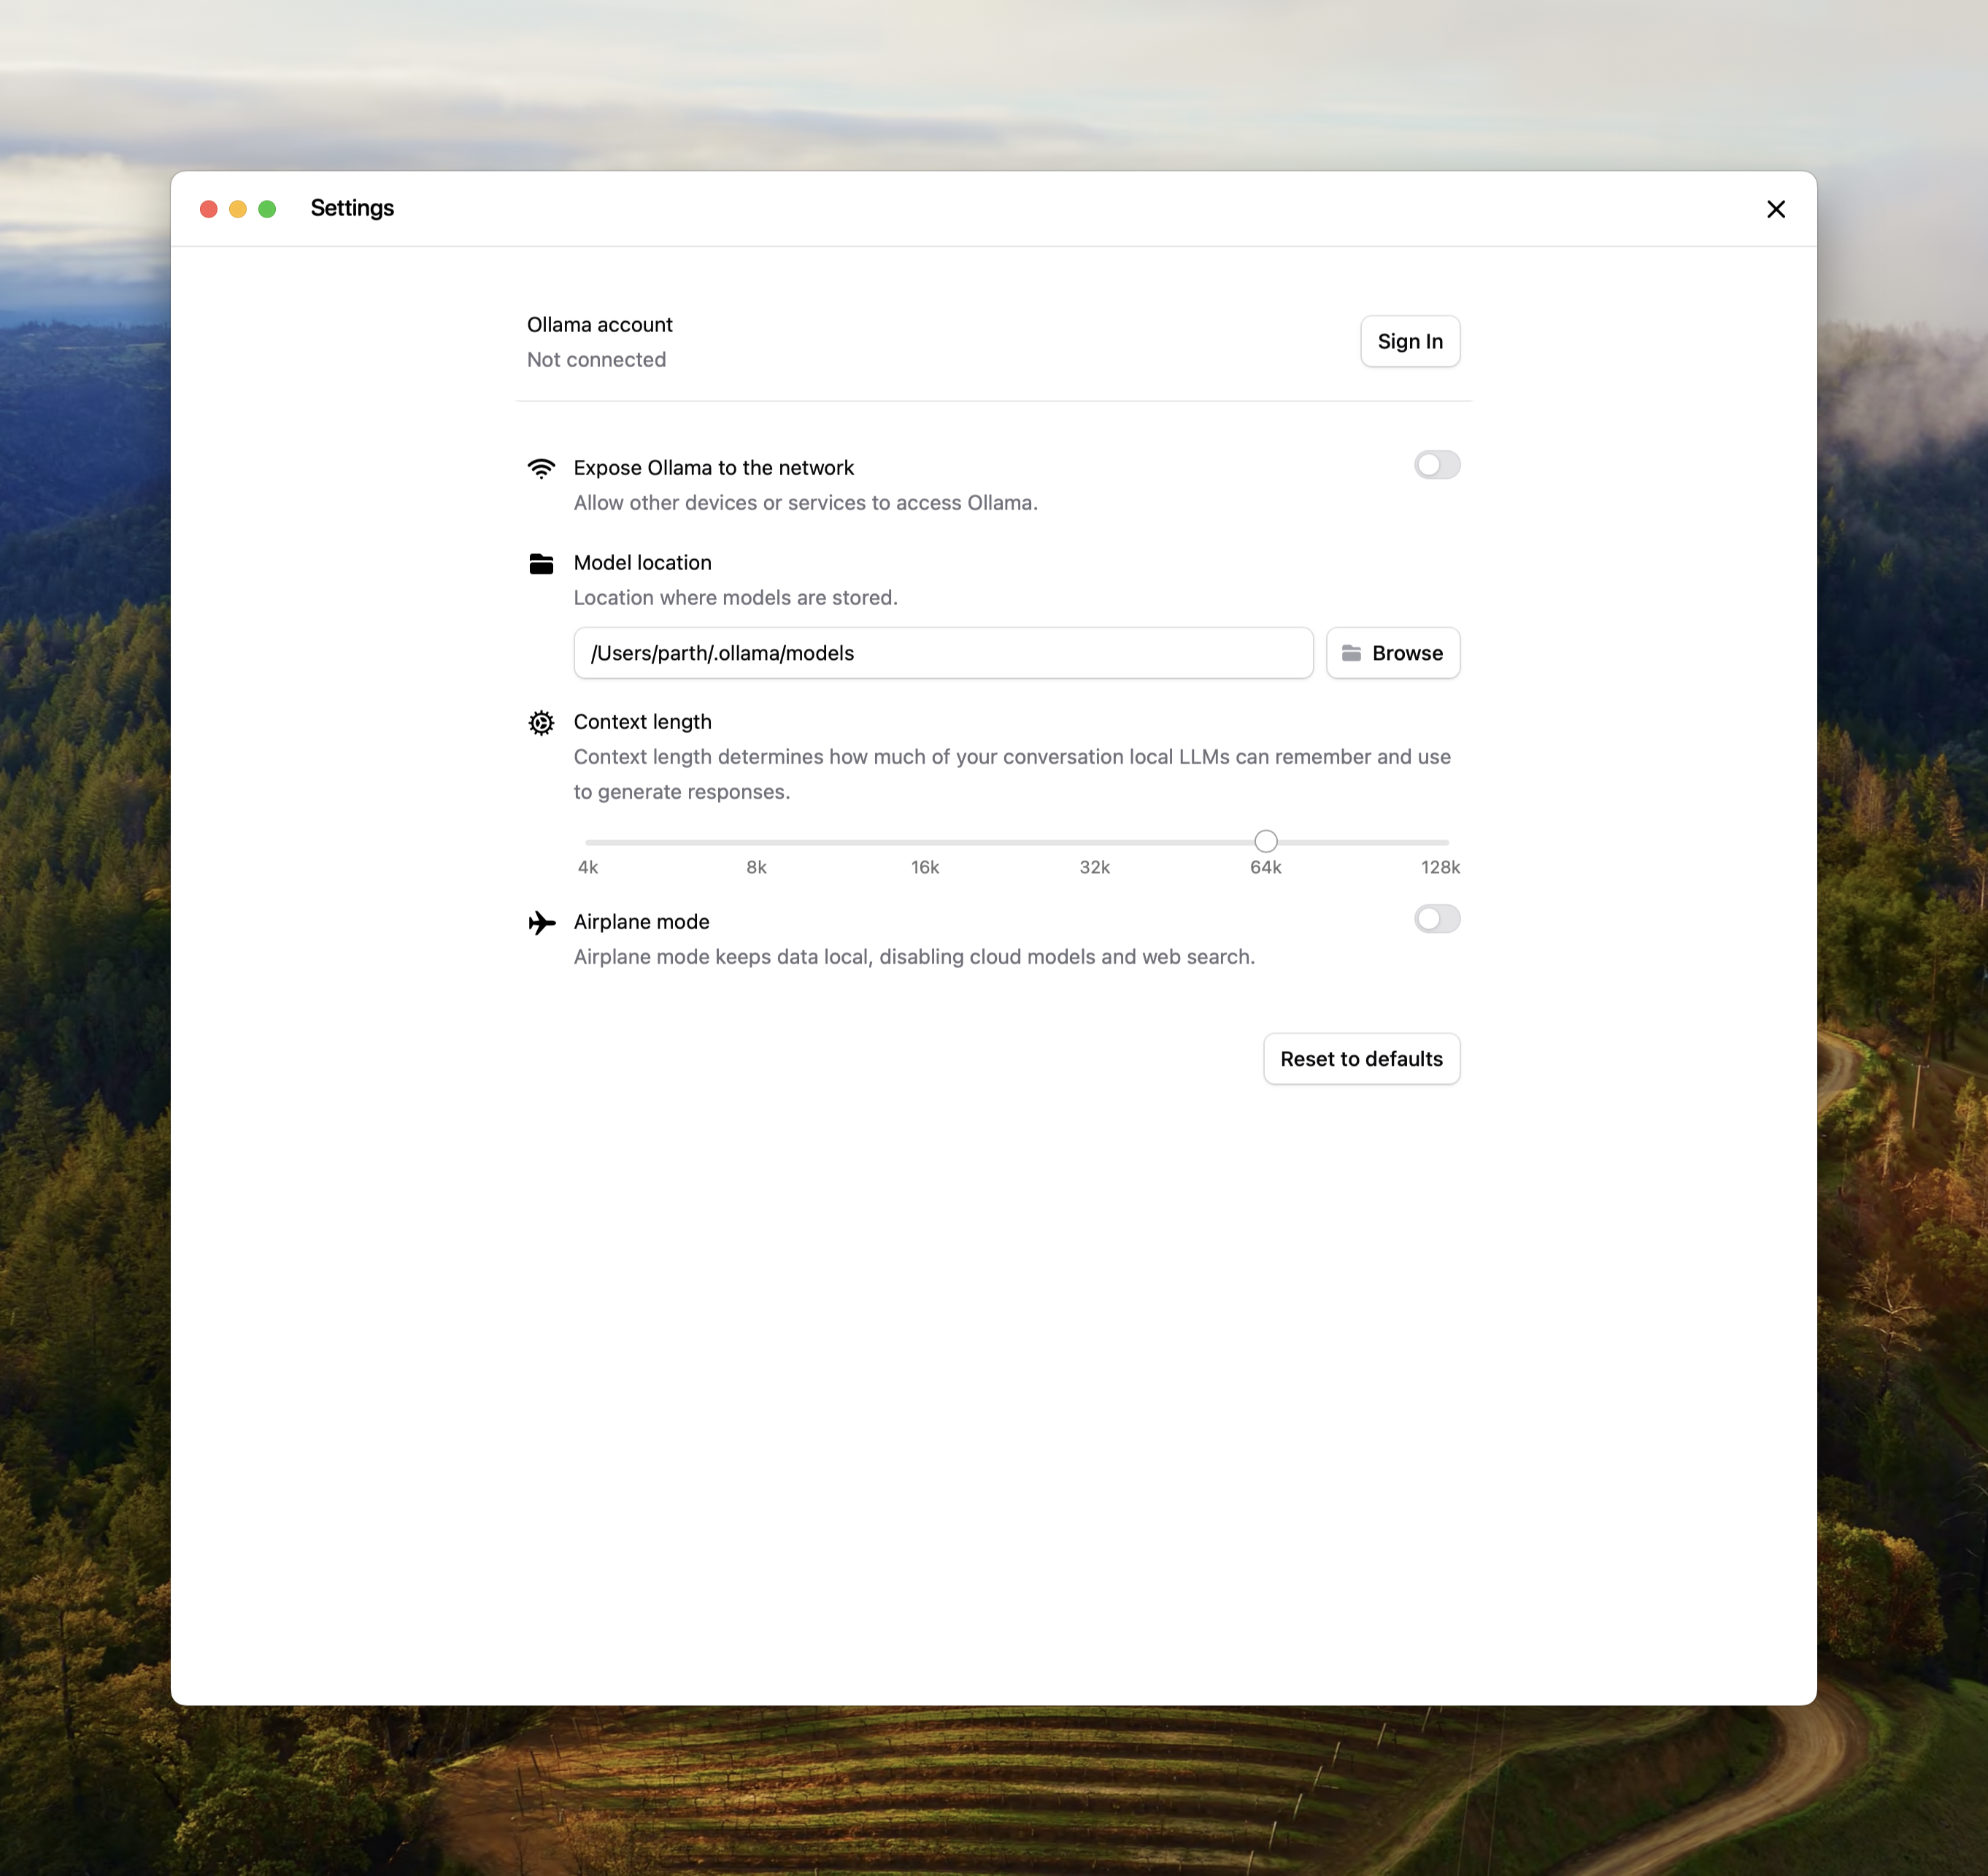 If editing the context length for Ollama is not possible, the context length can also be updated when serving Ollama.
### Check allocated context length and model offloading
For best performance, use the maximum context length for a model, and avoid offloading the model to CPU. Verify the split under `PROCESSOR` using `ollama ps`.
**Examples:**
Example 1 (unknown):
```unknown
OLLAMA_CONTEXT_LENGTH=32000 ollama serve
```
Example 2 (unknown):
```unknown
ollama ps
```
Example 3 (unknown):
```unknown
NAME ID SIZE PROCESSOR CONTEXT UNTIL
gemma3:latest a2af6cc3eb7f 6.6 GB 100% GPU 65536 2 minutes from now
```
---
## comment
**URL:** llms-txt#comment
**Contents:**
- Examples
- Basic `Modelfile`
INSTRUCTION arguments
**Examples:**
Example 1 (unknown):
```unknown
| Instruction | Description |
| ----------------------------------- | -------------------------------------------------------------- |
| [`FROM`](#from-required) (required) | Defines the base model to use. |
| [`PARAMETER`](#parameter) | Sets the parameters for how Ollama will run the model. |
| [`TEMPLATE`](#template) | The full prompt template to be sent to the model. |
| [`SYSTEM`](#system) | Specifies the system message that will be set in the template. |
| [`ADAPTER`](#adapter) | Defines the (Q)LoRA adapters to apply to the model. |
| [`LICENSE`](#license) | Specifies the legal license. |
| [`MESSAGE`](#message) | Specify message history. |
## Examples
### Basic `Modelfile`
An example of a `Modelfile` creating a mario blueprint:
```
---
## Allow all Chrome, Firefox, and Safari extensions
**URL:** llms-txt#allow-all-chrome,-firefox,-and-safari-extensions
**Contents:**
- Where are models stored?
- How do I set them to a different location?
- How can I use Ollama in Visual Studio Code?
- How do I use Ollama with GPU acceleration in Docker?
- Why is networking slow in WSL2 on Windows 10?
- How can I preload a model into Ollama to get faster response times?
- How do I keep a model loaded in memory or make it unload immediately?
- How do I manage the maximum number of requests the Ollama server can queue?
- How does Ollama handle concurrent requests?
- How does Ollama load models on multiple GPUs?
OLLAMA_ORIGINS=chrome-extension://*,moz-extension://*,safari-web-extension://* ollama serve
shell theme={"system"}
curl http://localhost:11434/api/generate -d '{"model": "mistral"}'
shell theme={"system"}
curl http://localhost:11434/api/chat -d '{"model": "mistral"}'
shell theme={"system"}
ollama run llama3.2 ""
shell theme={"system"}
ollama stop llama3.2
shell theme={"system"}
curl http://localhost:11434/api/generate -d '{"model": "llama3.2", "keep_alive": -1}'
shell theme={"system"}
curl http://localhost:11434/api/generate -d '{"model": "llama3.2", "keep_alive": 0}'
shell theme={"system"}
ollama signin
```
* **Manually copy & paste** the key on the **Ollama Keys** page:
[https://ollama.com/settings/keys](https://ollama.com/settings/keys)
### Where the Ollama Public Key lives
| OS | Path to `id_ed25519.pub` |
| :------ | :------------------------------------------- |
| macOS | `~/.ollama/id_ed25519.pub` |
| Linux | `/usr/share/ollama/.ollama/id_ed25519.pub` |
| Windows | `C:\Users\\.ollama\id_ed25519.pub` |
Replace \ with your actual Windows user name.
**Examples:**
Example 1 (unknown):
```unknown
Refer to the section [above](#how-do-i-configure-ollama-server) for how to set environment variables on your platform.
## Where are models stored?
* macOS: `~/.ollama/models`
* Linux: `/usr/share/ollama/.ollama/models`
* Windows: `C:\Users\%username%\.ollama\models`
### How do I set them to a different location?
If a different directory needs to be used, set the environment variable `OLLAMA_MODELS` to the chosen directory.
On Linux using the standard installer, the `ollama` user needs read and write access to the specified directory. To assign the directory to the `ollama` user run `sudo chown -R ollama:ollama `.
Refer to the section [above](#how-do-i-configure-ollama-server) for how to set environment variables on your platform.
## How can I use Ollama in Visual Studio Code?
There is already a large collection of plugins available for VSCode as well as other editors that leverage Ollama. See the list of [extensions & plugins](https://github.com/ollama/ollama#extensions--plugins) at the bottom of the main repository readme.
## How do I use Ollama with GPU acceleration in Docker?
The Ollama Docker container can be configured with GPU acceleration in Linux or Windows (with WSL2). This requires the [nvidia-container-toolkit](https://github.com/NVIDIA/nvidia-container-toolkit). See [ollama/ollama](https://hub.docker.com/r/ollama/ollama) for more details.
GPU acceleration is not available for Docker Desktop in macOS due to the lack of GPU passthrough and emulation.
## Why is networking slow in WSL2 on Windows 10?
This can impact both installing Ollama, as well as downloading models.
Open `Control Panel > Networking and Internet > View network status and tasks` and click on `Change adapter settings` on the left panel. Find the `vEthernel (WSL)` adapter, right click and select `Properties`.
Click on `Configure` and open the `Advanced` tab. Search through each of the properties until you find `Large Send Offload Version 2 (IPv4)` and `Large Send Offload Version 2 (IPv6)`. *Disable* both of these
properties.
## How can I preload a model into Ollama to get faster response times?
If you are using the API you can preload a model by sending the Ollama server an empty request. This works with both the `/api/generate` and `/api/chat` API endpoints.
To preload the mistral model using the generate endpoint, use:
```
Example 2 (unknown):
```unknown
To use the chat completions endpoint, use:
```
Example 3 (unknown):
```unknown
To preload a model using the CLI, use the command:
```
Example 4 (unknown):
```unknown
## How do I keep a model loaded in memory or make it unload immediately?
By default models are kept in memory for 5 minutes before being unloaded. This allows for quicker response times if you're making numerous requests to the LLM. If you want to immediately unload a model from memory, use the `ollama stop` command:
```
---
## Push a model
**URL:** llms-txt#push-a-model
Source: https://docs.ollama.com/api/push
openapi.yaml post /api/push
---
## List running models
**URL:** llms-txt#list-running-models
Source: https://docs.ollama.com/api/ps
openapi.yaml get /api/ps
Retrieve a list of models that are currently running
---
## Usage
**URL:** llms-txt#usage
**Contents:**
- Example response
Source: https://docs.ollama.com/api/usage
Ollama's API responses include metrics that can be used for measuring performance and model usage:
* `total_duration`: How long the response took to generate
* `load_duration`: How long the model took to load
* `prompt_eval_count`: How many input tokens were processed
* `prompt_eval_duration`: How long it took to evaluate the prompt
* `eval_count`: How many output tokens were processes
* `eval_duration`: How long it took to generate the output tokens
All timing values are measured in nanoseconds.
For endpoints that return usage metrics, the response body will include the usage fields. For example, a non-streaming call to `/api/generate` may return the following response:
For endpoints that return **streaming responses**, usage fields are included as part of the final chunk, where `done` is `true`.
---
## OpenAI compatibility
**URL:** llms-txt#openai-compatibility
**Contents:**
- Usage
- OpenAI Python library
Source: https://docs.ollama.com/api/openai-compatibility
Ollama provides compatibility with parts of the [OpenAI API](https://platform.openai.com/docs/api-reference) to help connect existing applications to Ollama.
### OpenAI Python library
#### Structured outputs
```python theme={"system"}
from pydantic import BaseModel
from openai import OpenAI
client = OpenAI(base_url="http://localhost:11434/v1", api_key="ollama")
**Examples:**
Example 1 (unknown):
```unknown
#### Structured outputs
```
---
## Streaming
**URL:** llms-txt#streaming
**Contents:**
- Key streaming concepts
- Handling streamed chunks
Source: https://docs.ollama.com/capabilities/streaming
Streaming allows you to render text as it is produced by the model.
Streaming is enabled by default through the REST API, but disabled by default in the SDKs.
To enable streaming in the SDKs, set the `stream` parameter to `True`.
## Key streaming concepts
1. Chatting: Stream partial assistant messages. Each chunk includes the `content` so you can render messages as they arrive.
2. Thinking: Thinking-capable models emit a `thinking` field alongside regular content in each chunk. Detect this field in streaming chunks to show or hide reasoning traces before the final answer arrives.
3. Tool calling: Watch for streamed `tool_calls` in each chunk, execute the requested tool, and append tool outputs back into the conversation.
## Handling streamed chunks
It is necessary to accumulate the partial fields in order to maintain the history of the conversation. This is particularly important for tool calling where the thinking, tool call from the model, and the executed tool result must be passed back to the model in the next request.
**Examples:**
Example 1 (unknown):
```unknown
```
---
## Droid
**URL:** llms-txt#droid
**Contents:**
- Install
- Usage with Ollama
- Cloud Models
- Connecting to ollama.com
Source: https://docs.ollama.com/integrations/droid
Install the [Droid CLI](https://factory.ai/):
Droid requires a larger context window. It is recommended to use a context window of at least 32K tokens. See [Context length](/context-length) for more information.
Add a local configuration block to `~/.factory/config.json`:
`qwen3-coder:480b-cloud` is the recommended model for use with Droid.
Add the cloud configuration block to `~/.factory/config.json`:
## Connecting to ollama.com
1. Create an [API key](https://ollama.com/settings/keys) from ollama.com and export it as `OLLAMA_API_KEY`.
2. Add the cloud configuration block to `~/.factory/config.json`:
Run `droid` in a new terminal to load the new settings.
**Examples:**
Example 1 (unknown):
```unknown
Droid requires a larger context window. It is recommended to use a context window of at least 32K tokens. See [Context length](/context-length) for more information.
## Usage with Ollama
Add a local configuration block to `~/.factory/config.json`:
```
Example 2 (unknown):
```unknown
## Cloud Models
`qwen3-coder:480b-cloud` is the recommended model for use with Droid.
Add the cloud configuration block to `~/.factory/config.json`:
```
Example 3 (unknown):
```unknown
## Connecting to ollama.com
1. Create an [API key](https://ollama.com/settings/keys) from ollama.com and export it as `OLLAMA_API_KEY`.
2. Add the cloud configuration block to `~/.factory/config.json`:
```
---
## Copy a model
**URL:** llms-txt#copy-a-model
Source: https://docs.ollama.com/api/copy
openapi.yaml post /api/copy
---
## Authentication
**URL:** llms-txt#authentication
**Contents:**
- Signing in
- API keys
Source: https://docs.ollama.com/api/authentication
No authentication is required when accessing Ollama's API locally via `http://localhost:11434`.
Authentication is required for the following:
* Running cloud models via ollama.com
* Publishing models
* Downloading private models
Ollama supports two authentication methods:
* **Signing in**: sign in from your local installation, and Ollama will automatically take care of authenticating requests to ollama.com when running commands
* **API keys**: API keys for programmatic access to ollama.com's API
To sign in to ollama.com from your local installation of Ollama, run:
Once signed in, Ollama will automatically authenticate commands as required:
Similarly, when accessing a local API endpoint that requires cloud access, Ollama will automatically authenticate the request:
For direct access to ollama.com's API served at `https://ollama.com/api`, authentication via API keys is required.
First, create an [API key](https://ollama.com/settings/keys), then set the `OLLAMA_API_KEY` environment variable:
Then use the API key in the Authorization header:
API keys don't currently expire, however you can revoke them at any time in your [API keys settings](https://ollama.com/settings/keys).
**Examples:**
Example 1 (unknown):
```unknown
ollama signin
```
Example 2 (unknown):
```unknown
ollama run gpt-oss:120b-cloud
```
Example 3 (unknown):
```unknown
## API keys
For direct access to ollama.com's API served at `https://ollama.com/api`, authentication via API keys is required.
First, create an [API key](https://ollama.com/settings/keys), then set the `OLLAMA_API_KEY` environment variable:
```
Example 4 (unknown):
```unknown
Then use the API key in the Authorization header:
```
---
## CLI Reference
**URL:** llms-txt#cli-reference
**Contents:**
- Run a model
- Download a model
- Remove a model
- List models
- Sign in to Ollama
- Sign out of Ollama
- Create a customized model
- List running models
- Stop a running model
- Start Ollama
Source: https://docs.ollama.com/cli
For multiline input, you can wrap text with `"""`:
#### Multimodal models
### Sign in to Ollama
### Sign out of Ollama
### Create a customized model
First, create a `Modelfile`
Then run `ollama create`:
### List running models
### Stop a running model
To view a list of environment variables that can be set run `ollama serve --help`
**Examples:**
Example 1 (unknown):
```unknown
ollama run gemma3
```
Example 2 (unknown):
```unknown
>>> """Hello,
... world!
... """
I'm a basic program that prints the famous "Hello, world!" message to the console.
```
Example 3 (unknown):
```unknown
ollama run gemma3 "What's in this image? /Users/jmorgan/Desktop/smile.png"
```
Example 4 (unknown):
```unknown
ollama pull gemma3
```
---
## sets the temperature to 1 [higher is more creative, lower is more coherent]
**URL:** llms-txt#sets-the-temperature-to-1-[higher-is-more-creative,-lower-is-more-coherent]
PARAMETER temperature 1
---
## Windows
**URL:** llms-txt#windows
**Contents:**
- System Requirements
- Filesystem Requirements
- Changing Install Location
- Changing Model Location
- API Access
- Troubleshooting
- Uninstall
- Standalone CLI
Source: https://docs.ollama.com/windows
Ollama runs as a native Windows application, including NVIDIA and AMD Radeon GPU support.
After installing Ollama for Windows, Ollama will run in the background and
the `ollama` command line is available in `cmd`, `powershell` or your favorite
terminal application. As usual the Ollama [API](/api) will be served on
`http://localhost:11434`.
## System Requirements
* Windows 10 22H2 or newer, Home or Pro
* NVIDIA 452.39 or newer Drivers if you have an NVIDIA card
* AMD Radeon Driver [https://www.amd.com/en/support](https://www.amd.com/en/support) if you have a Radeon card
Ollama uses unicode characters for progress indication, which may render as unknown squares in some older terminal fonts in Windows 10. If you see this, try changing your terminal font settings.
## Filesystem Requirements
The Ollama install does not require Administrator, and installs in your home directory by default. You'll need at least 4GB of space for the binary install. Once you've installed Ollama, you'll need additional space for storing the Large Language models, which can be tens to hundreds of GB in size. If your home directory doesn't have enough space, you can change where the binaries are installed, and where the models are stored.
### Changing Install Location
To install the Ollama application in a location different than your home directory, start the installer with the following flag
### Changing Model Location
To change where Ollama stores the downloaded models instead of using your home directory, set the environment variable `OLLAMA_MODELS` in your user account.
1. Start the Settings (Windows 11) or Control Panel (Windows 10) application and search for *environment variables*.
2. Click on *Edit environment variables for your account*.
3. Edit or create a new variable for your user account for `OLLAMA_MODELS` where you want the models stored
4. Click OK/Apply to save.
If Ollama is already running, Quit the tray application and relaunch it from the Start menu, or a new terminal started after you saved the environment variables.
Here's a quick example showing API access from `powershell`
Ollama on Windows stores files in a few different locations. You can view them in
the explorer window by hitting `+R` and type in:
* `explorer %LOCALAPPDATA%\Ollama` contains logs, and downloaded updates
* *app.log* contains most resent logs from the GUI application
* *server.log* contains the most recent server logs
* *upgrade.log* contains log output for upgrades
* `explorer %LOCALAPPDATA%\Programs\Ollama` contains the binaries (The installer adds this to your user PATH)
* `explorer %HOMEPATH%\.ollama` contains models and configuration
* `explorer %TEMP%` contains temporary executable files in one or more `ollama*` directories
The Ollama Windows installer registers an Uninstaller application. Under `Add or remove programs` in Windows Settings, you can uninstall Ollama.
If you have [changed the OLLAMA\_MODELS location](#changing-model-location), the installer will not remove your downloaded models
The easiest way to install Ollama on Windows is to use the `OllamaSetup.exe`
installer. It installs in your account without requiring Administrator rights.
We update Ollama regularly to support the latest models, and this installer will
help you keep up to date.
If you'd like to install or integrate Ollama as a service, a standalone
`ollama-windows-amd64.zip` zip file is available containing only the Ollama CLI
and GPU library dependencies for Nvidia. If you have an AMD GPU, also download
and extract the additional ROCm package `ollama-windows-amd64-rocm.zip` into the
same directory. This allows for embedding Ollama in existing applications, or
running it as a system service via `ollama serve` with tools such as
[NSSM](https://nssm.cc/).
If you are upgrading from a prior version, you should remove the old directories first.
**Examples:**
Example 1 (unknown):
```unknown
### Changing Model Location
To change where Ollama stores the downloaded models instead of using your home directory, set the environment variable `OLLAMA_MODELS` in your user account.
1. Start the Settings (Windows 11) or Control Panel (Windows 10) application and search for *environment variables*.
2. Click on *Edit environment variables for your account*.
3. Edit or create a new variable for your user account for `OLLAMA_MODELS` where you want the models stored
4. Click OK/Apply to save.
If Ollama
…(truncated)
If editing the context length for Ollama is not possible, the context length can also be updated when serving Ollama.
### Check allocated context length and model offloading
For best performance, use the maximum context length for a model, and avoid offloading the model to CPU. Verify the split under `PROCESSOR` using `ollama ps`.
**Examples:**
Example 1 (unknown):
```unknown
OLLAMA_CONTEXT_LENGTH=32000 ollama serve
```
Example 2 (unknown):
```unknown
ollama ps
```
Example 3 (unknown):
```unknown
NAME ID SIZE PROCESSOR CONTEXT UNTIL
gemma3:latest a2af6cc3eb7f 6.6 GB 100% GPU 65536 2 minutes from now
```
---
## comment
**URL:** llms-txt#comment
**Contents:**
- Examples
- Basic `Modelfile`
INSTRUCTION arguments
**Examples:**
Example 1 (unknown):
```unknown
| Instruction | Description |
| ----------------------------------- | -------------------------------------------------------------- |
| [`FROM`](#from-required) (required) | Defines the base model to use. |
| [`PARAMETER`](#parameter) | Sets the parameters for how Ollama will run the model. |
| [`TEMPLATE`](#template) | The full prompt template to be sent to the model. |
| [`SYSTEM`](#system) | Specifies the system message that will be set in the template. |
| [`ADAPTER`](#adapter) | Defines the (Q)LoRA adapters to apply to the model. |
| [`LICENSE`](#license) | Specifies the legal license. |
| [`MESSAGE`](#message) | Specify message history. |
## Examples
### Basic `Modelfile`
An example of a `Modelfile` creating a mario blueprint:
```
---
## Allow all Chrome, Firefox, and Safari extensions
**URL:** llms-txt#allow-all-chrome,-firefox,-and-safari-extensions
**Contents:**
- Where are models stored?
- How do I set them to a different location?
- How can I use Ollama in Visual Studio Code?
- How do I use Ollama with GPU acceleration in Docker?
- Why is networking slow in WSL2 on Windows 10?
- How can I preload a model into Ollama to get faster response times?
- How do I keep a model loaded in memory or make it unload immediately?
- How do I manage the maximum number of requests the Ollama server can queue?
- How does Ollama handle concurrent requests?
- How does Ollama load models on multiple GPUs?
OLLAMA_ORIGINS=chrome-extension://*,moz-extension://*,safari-web-extension://* ollama serve
shell theme={"system"}
curl http://localhost:11434/api/generate -d '{"model": "mistral"}'
shell theme={"system"}
curl http://localhost:11434/api/chat -d '{"model": "mistral"}'
shell theme={"system"}
ollama run llama3.2 ""
shell theme={"system"}
ollama stop llama3.2
shell theme={"system"}
curl http://localhost:11434/api/generate -d '{"model": "llama3.2", "keep_alive": -1}'
shell theme={"system"}
curl http://localhost:11434/api/generate -d '{"model": "llama3.2", "keep_alive": 0}'
shell theme={"system"}
ollama signin
```
* **Manually copy & paste** the key on the **Ollama Keys** page:
[https://ollama.com/settings/keys](https://ollama.com/settings/keys)
### Where the Ollama Public Key lives
| OS | Path to `id_ed25519.pub` |
| :------ | :------------------------------------------- |
| macOS | `~/.ollama/id_ed25519.pub` |
| Linux | `/usr/share/ollama/.ollama/id_ed25519.pub` |
| Windows | `C:\Users\\.ollama\id_ed25519.pub` |
Replace \ with your actual Windows user name.
**Examples:**
Example 1 (unknown):
```unknown
Refer to the section [above](#how-do-i-configure-ollama-server) for how to set environment variables on your platform.
## Where are models stored?
* macOS: `~/.ollama/models`
* Linux: `/usr/share/ollama/.ollama/models`
* Windows: `C:\Users\%username%\.ollama\models`
### How do I set them to a different location?
If a different directory needs to be used, set the environment variable `OLLAMA_MODELS` to the chosen directory.
On Linux using the standard installer, the `ollama` user needs read and write access to the specified directory. To assign the directory to the `ollama` user run `sudo chown -R ollama:ollama `.
Refer to the section [above](#how-do-i-configure-ollama-server) for how to set environment variables on your platform.
## How can I use Ollama in Visual Studio Code?
There is already a large collection of plugins available for VSCode as well as other editors that leverage Ollama. See the list of [extensions & plugins](https://github.com/ollama/ollama#extensions--plugins) at the bottom of the main repository readme.
## How do I use Ollama with GPU acceleration in Docker?
The Ollama Docker container can be configured with GPU acceleration in Linux or Windows (with WSL2). This requires the [nvidia-container-toolkit](https://github.com/NVIDIA/nvidia-container-toolkit). See [ollama/ollama](https://hub.docker.com/r/ollama/ollama) for more details.
GPU acceleration is not available for Docker Desktop in macOS due to the lack of GPU passthrough and emulation.
## Why is networking slow in WSL2 on Windows 10?
This can impact both installing Ollama, as well as downloading models.
Open `Control Panel > Networking and Internet > View network status and tasks` and click on `Change adapter settings` on the left panel. Find the `vEthernel (WSL)` adapter, right click and select `Properties`.
Click on `Configure` and open the `Advanced` tab. Search through each of the properties until you find `Large Send Offload Version 2 (IPv4)` and `Large Send Offload Version 2 (IPv6)`. *Disable* both of these
properties.
## How can I preload a model into Ollama to get faster response times?
If you are using the API you can preload a model by sending the Ollama server an empty request. This works with both the `/api/generate` and `/api/chat` API endpoints.
To preload the mistral model using the generate endpoint, use:
```
Example 2 (unknown):
```unknown
To use the chat completions endpoint, use:
```
Example 3 (unknown):
```unknown
To preload a model using the CLI, use the command:
```
Example 4 (unknown):
```unknown
## How do I keep a model loaded in memory or make it unload immediately?
By default models are kept in memory for 5 minutes before being unloaded. This allows for quicker response times if you're making numerous requests to the LLM. If you want to immediately unload a model from memory, use the `ollama stop` command:
```
---
## Push a model
**URL:** llms-txt#push-a-model
Source: https://docs.ollama.com/api/push
openapi.yaml post /api/push
---
## List running models
**URL:** llms-txt#list-running-models
Source: https://docs.ollama.com/api/ps
openapi.yaml get /api/ps
Retrieve a list of models that are currently running
---
## Usage
**URL:** llms-txt#usage
**Contents:**
- Example response
Source: https://docs.ollama.com/api/usage
Ollama's API responses include metrics that can be used for measuring performance and model usage:
* `total_duration`: How long the response took to generate
* `load_duration`: How long the model took to load
* `prompt_eval_count`: How many input tokens were processed
* `prompt_eval_duration`: How long it took to evaluate the prompt
* `eval_count`: How many output tokens were processes
* `eval_duration`: How long it took to generate the output tokens
All timing values are measured in nanoseconds.
For endpoints that return usage metrics, the response body will include the usage fields. For example, a non-streaming call to `/api/generate` may return the following response:
For endpoints that return **streaming responses**, usage fields are included as part of the final chunk, where `done` is `true`.
---
## OpenAI compatibility
**URL:** llms-txt#openai-compatibility
**Contents:**
- Usage
- OpenAI Python library
Source: https://docs.ollama.com/api/openai-compatibility
Ollama provides compatibility with parts of the [OpenAI API](https://platform.openai.com/docs/api-reference) to help connect existing applications to Ollama.
### OpenAI Python library
#### Structured outputs
```python theme={"system"}
from pydantic import BaseModel
from openai import OpenAI
client = OpenAI(base_url="http://localhost:11434/v1", api_key="ollama")
**Examples:**
Example 1 (unknown):
```unknown
#### Structured outputs
```
---
## Streaming
**URL:** llms-txt#streaming
**Contents:**
- Key streaming concepts
- Handling streamed chunks
Source: https://docs.ollama.com/capabilities/streaming
Streaming allows you to render text as it is produced by the model.
Streaming is enabled by default through the REST API, but disabled by default in the SDKs.
To enable streaming in the SDKs, set the `stream` parameter to `True`.
## Key streaming concepts
1. Chatting: Stream partial assistant messages. Each chunk includes the `content` so you can render messages as they arrive.
2. Thinking: Thinking-capable models emit a `thinking` field alongside regular content in each chunk. Detect this field in streaming chunks to show or hide reasoning traces before the final answer arrives.
3. Tool calling: Watch for streamed `tool_calls` in each chunk, execute the requested tool, and append tool outputs back into the conversation.
## Handling streamed chunks
It is necessary to accumulate the partial fields in order to maintain the history of the conversation. This is particularly important for tool calling where the thinking, tool call from the model, and the executed tool result must be passed back to the model in the next request.
**Examples:**
Example 1 (unknown):
```unknown
```
---
## Droid
**URL:** llms-txt#droid
**Contents:**
- Install
- Usage with Ollama
- Cloud Models
- Connecting to ollama.com
Source: https://docs.ollama.com/integrations/droid
Install the [Droid CLI](https://factory.ai/):
Droid requires a larger context window. It is recommended to use a context window of at least 32K tokens. See [Context length](/context-length) for more information.
Add a local configuration block to `~/.factory/config.json`:
`qwen3-coder:480b-cloud` is the recommended model for use with Droid.
Add the cloud configuration block to `~/.factory/config.json`:
## Connecting to ollama.com
1. Create an [API key](https://ollama.com/settings/keys) from ollama.com and export it as `OLLAMA_API_KEY`.
2. Add the cloud configuration block to `~/.factory/config.json`:
Run `droid` in a new terminal to load the new settings.
**Examples:**
Example 1 (unknown):
```unknown
Droid requires a larger context window. It is recommended to use a context window of at least 32K tokens. See [Context length](/context-length) for more information.
## Usage with Ollama
Add a local configuration block to `~/.factory/config.json`:
```
Example 2 (unknown):
```unknown
## Cloud Models
`qwen3-coder:480b-cloud` is the recommended model for use with Droid.
Add the cloud configuration block to `~/.factory/config.json`:
```
Example 3 (unknown):
```unknown
## Connecting to ollama.com
1. Create an [API key](https://ollama.com/settings/keys) from ollama.com and export it as `OLLAMA_API_KEY`.
2. Add the cloud configuration block to `~/.factory/config.json`:
```
---
## Copy a model
**URL:** llms-txt#copy-a-model
Source: https://docs.ollama.com/api/copy
openapi.yaml post /api/copy
---
## Authentication
**URL:** llms-txt#authentication
**Contents:**
- Signing in
- API keys
Source: https://docs.ollama.com/api/authentication
No authentication is required when accessing Ollama's API locally via `http://localhost:11434`.
Authentication is required for the following:
* Running cloud models via ollama.com
* Publishing models
* Downloading private models
Ollama supports two authentication methods:
* **Signing in**: sign in from your local installation, and Ollama will automatically take care of authenticating requests to ollama.com when running commands
* **API keys**: API keys for programmatic access to ollama.com's API
To sign in to ollama.com from your local installation of Ollama, run:
Once signed in, Ollama will automatically authenticate commands as required:
Similarly, when accessing a local API endpoint that requires cloud access, Ollama will automatically authenticate the request:
For direct access to ollama.com's API served at `https://ollama.com/api`, authentication via API keys is required.
First, create an [API key](https://ollama.com/settings/keys), then set the `OLLAMA_API_KEY` environment variable:
Then use the API key in the Authorization header:
API keys don't currently expire, however you can revoke them at any time in your [API keys settings](https://ollama.com/settings/keys).
**Examples:**
Example 1 (unknown):
```unknown
ollama signin
```
Example 2 (unknown):
```unknown
ollama run gpt-oss:120b-cloud
```
Example 3 (unknown):
```unknown
## API keys
For direct access to ollama.com's API served at `https://ollama.com/api`, authentication via API keys is required.
First, create an [API key](https://ollama.com/settings/keys), then set the `OLLAMA_API_KEY` environment variable:
```
Example 4 (unknown):
```unknown
Then use the API key in the Authorization header:
```
---
## CLI Reference
**URL:** llms-txt#cli-reference
**Contents:**
- Run a model
- Download a model
- Remove a model
- List models
- Sign in to Ollama
- Sign out of Ollama
- Create a customized model
- List running models
- Stop a running model
- Start Ollama
Source: https://docs.ollama.com/cli
For multiline input, you can wrap text with `"""`:
#### Multimodal models
### Sign in to Ollama
### Sign out of Ollama
### Create a customized model
First, create a `Modelfile`
Then run `ollama create`:
### List running models
### Stop a running model
To view a list of environment variables that can be set run `ollama serve --help`
**Examples:**
Example 1 (unknown):
```unknown
ollama run gemma3
```
Example 2 (unknown):
```unknown
>>> """Hello,
... world!
... """
I'm a basic program that prints the famous "Hello, world!" message to the console.
```
Example 3 (unknown):
```unknown
ollama run gemma3 "What's in this image? /Users/jmorgan/Desktop/smile.png"
```
Example 4 (unknown):
```unknown
ollama pull gemma3
```
---
## sets the temperature to 1 [higher is more creative, lower is more coherent]
**URL:** llms-txt#sets-the-temperature-to-1-[higher-is-more-creative,-lower-is-more-coherent]
PARAMETER temperature 1
---
## Windows
**URL:** llms-txt#windows
**Contents:**
- System Requirements
- Filesystem Requirements
- Changing Install Location
- Changing Model Location
- API Access
- Troubleshooting
- Uninstall
- Standalone CLI
Source: https://docs.ollama.com/windows
Ollama runs as a native Windows application, including NVIDIA and AMD Radeon GPU support.
After installing Ollama for Windows, Ollama will run in the background and
the `ollama` command line is available in `cmd`, `powershell` or your favorite
terminal application. As usual the Ollama [API](/api) will be served on
`http://localhost:11434`.
## System Requirements
* Windows 10 22H2 or newer, Home or Pro
* NVIDIA 452.39 or newer Drivers if you have an NVIDIA card
* AMD Radeon Driver [https://www.amd.com/en/support](https://www.amd.com/en/support) if you have a Radeon card
Ollama uses unicode characters for progress indication, which may render as unknown squares in some older terminal fonts in Windows 10. If you see this, try changing your terminal font settings.
## Filesystem Requirements
The Ollama install does not require Administrator, and installs in your home directory by default. You'll need at least 4GB of space for the binary install. Once you've installed Ollama, you'll need additional space for storing the Large Language models, which can be tens to hundreds of GB in size. If your home directory doesn't have enough space, you can change where the binaries are installed, and where the models are stored.
### Changing Install Location
To install the Ollama application in a location different than your home directory, start the installer with the following flag
### Changing Model Location
To change where Ollama stores the downloaded models instead of using your home directory, set the environment variable `OLLAMA_MODELS` in your user account.
1. Start the Settings (Windows 11) or Control Panel (Windows 10) application and search for *environment variables*.
2. Click on *Edit environment variables for your account*.
3. Edit or create a new variable for your user account for `OLLAMA_MODELS` where you want the models stored
4. Click OK/Apply to save.
If Ollama is already running, Quit the tray application and relaunch it from the Start menu, or a new terminal started after you saved the environment variables.
Here's a quick example showing API access from `powershell`
Ollama on Windows stores files in a few different locations. You can view them in
the explorer window by hitting `+R` and type in:
* `explorer %LOCALAPPDATA%\Ollama` contains logs, and downloaded updates
* *app.log* contains most resent logs from the GUI application
* *server.log* contains the most recent server logs
* *upgrade.log* contains log output for upgrades
* `explorer %LOCALAPPDATA%\Programs\Ollama` contains the binaries (The installer adds this to your user PATH)
* `explorer %HOMEPATH%\.ollama` contains models and configuration
* `explorer %TEMP%` contains temporary executable files in one or more `ollama*` directories
The Ollama Windows installer registers an Uninstaller application. Under `Add or remove programs` in Windows Settings, you can uninstall Ollama.
If you have [changed the OLLAMA\_MODELS location](#changing-model-location), the installer will not remove your downloaded models
The easiest way to install Ollama on Windows is to use the `OllamaSetup.exe`
installer. It installs in your account without requiring Administrator rights.
We update Ollama regularly to support the latest models, and this installer will
help you keep up to date.
If you'd like to install or integrate Ollama as a service, a standalone
`ollama-windows-amd64.zip` zip file is available containing only the Ollama CLI
and GPU library dependencies for Nvidia. If you have an AMD GPU, also download
and extract the additional ROCm package `ollama-windows-amd64-rocm.zip` into the
same directory. This allows for embedding Ollama in existing applications, or
running it as a system service via `ollama serve` with tools such as
[NSSM](https://nssm.cc/).
If you are upgrading from a prior version, you should remove the old directories first.
**Examples:**
Example 1 (unknown):
```unknown
### Changing Model Location
To change where Ollama stores the downloaded models instead of using your home directory, set the environment variable `OLLAMA_MODELS` in your user account.
1. Start the Settings (Windows 11) or Control Panel (Windows 10) application and search for *environment variables*.
2. Click on *Edit environment variables for your account*.
3. Edit or create a new variable for your user account for `OLLAMA_MODELS` where you want the models stored
4. Click OK/Apply to save.
If Ollama
…(truncated)